Tuesday, March 19, 2013

Eggplant & beef moussaka


Ugh. There comes a time when a blogger becomes accountable to her blog - even despite the modest number of viewers of this one here. I write this for myself, really. Otherwise I suppose I would have stopped a while ago. At some point, I'd like to have a repository of tested and tried recipes that I can refer to as my culinary "repertoire." It's been very nice to leaf through this blog at times and remember what I was making last year, what type of food I was into and what I was buying. It's a lot like browsing through photo albums with photos of you at all ages. I believe we are what we eat so I, too, was at every point in time the embodiment of my dietary creed of that period. Think of these posts as my self-portraits, if you will. (and yes, I'm aware my last post was a pizza)

At some point, you become responsible for posting regularly, for putting good content "out there," because, let's face it, this is the Internet and any kitchen klutz could find my blog through a really unlikely chain of events, and decide they want to try, say, my zacusca recipe. So you see, I can't in good conscience promote recipes that I don't honestly consider absolutely glorious. What kind of person would I be, really, if I purposefully led some culinary naives astray? And with the two readers (thanks mom and dad) that I have, could I afford gambling any credibility, should an innocent viewer happen upon this blog?

So I test this stuff. I test it a lot. There are countless dishes I make that don't turn out that great and that I wouldn't really recommend. I take photos each time, but few make it to the blog. This page, really, is for memorable meals.

Since I'm now so blissfully zen (you know you envy me) and eat more leaves than a ruminant animal, I'm also more interested in intellectual enlightenment. Which is another way to say I kind of miss being in college. You know, using polysyllabic words and philosophizing with whomever would care to listen. So with all the nostalgia, I've been taking loads of classes on Coursera - in case you didn't know, it's an awesome platform for free online courses from top universities in the US and the rest of the world. I love Coursera. Anything you could care about, they have a course about it. It's terrific. It's been keeping me busy lately and I've hardly had time to write. But it's worth it.

I haven't stopped cooking though. A girl's got to eat, after all. A while ago I made this beef and eggplant moussaka, which is a mixture of my memories from home, some recipes I've found online and my own intuition. It's definitely a winner. I very seldom eat red meat, so this is definitely a special occasion. I've also made a vegetarian version of this, which I'll be happy to post at some point. For now, remember to buy beef only from local, happy cows, and enjoy this feast!


Eggplant & beef moussaka
~ serves 6

2 medium eggplants, cut into 1/2-inch slices
1 28-oz can chopped tomatoes (I use Pomi)
1 medium yellow onion
1 pound ground beef from local, happy cows
1 cup shredded cheese (goat Gouda or cheddar will work)
1 Tbsp dried mint (basil, oregano will also work here if you don't have mint)
olive oil
salt, pepper, to taste


In a pot over medium-low heat, pour about 2 tbsp of olive oil. When the oil is hot, saute the onions until transparent, about 3 minutes. Add the ground beef and cook until brown, stirring constantly, about 10 minutes or so. Gradually add the chopped tomatoes, then add the mint and cook for another 5 minutes (Note: if the mixture if getting too liquid, don't add all the tomatoes).


Preheat the oven to 350. Take a 9 x 13 or similar baking dish and oil it well inside. Put a layer of eggplant slices (there will be 3 of these, so plan for it) and sprinkle a little salt. Then put a layer of the ground beef mixture (there will be 2 of these, so put half). Another layer of eggplant slices, a little salt, another layer of ground beef, and finally eggplant at the very top. You don't have to sprinkle salt on this one, just the cheese and some nice herbs (I chose basil).


Bake covered for 45 minutes, then leave uncovered for the last 15 to give it a nice brown color. Voila!


Questions are welcome! Leave a comment below.

Thursday, February 7, 2013

Homemade pizza, incidentally gluten-free


Some time ago, when I was experimenting with the gluten-free cuisine, I tried to order a gluten-free pizza from a local, well-respected place around Albuquerque. Yeah it sounded weird, but I thought I'd give it a shot. At Pizza 9 and Luigi's (both otherwise decent pizza joints), I was told that the gluten-free pizza comes in one size only. That is because they don't make it in-house (easy to imagine why - with all the gluten-full flour flying about, contamination would be a sure thing). So I went with Pizza 9. And I must say that I had an awful, awful experience. I wish I could undo it, it was that bad. The crust tasted like medicine (if you've ever eaten something expired from a can in your pantry, imagine that) and it generously imparted this flavor to the entire pie. I forced myself to eat it and with every bite decided anew that I would never, ever try this again.

Years later however, I decided to try again. But this time I'd make it myself. Pizza is one of the rare treats that I allow myself every couple of months. And when I do, I enjoy it tremendously. So I thought of the people who have to live with Celiac disease - they should be able to enjoy this marvelous treat too, wouldn't that be fair? So I bought this Chebe tapioca-based pizza crust I found at Sprouts Market and followed the instructions on the package to make the crust.


First, it must be said that Chebe only contains 6 ingredients, and 3 of those are spices. I probably wouldn't buy anything that comes in a box otherwise. According to the package, this mix is not only gluten-free but also free of soy, corn, yeast, peanuts, eggs, dairy, sugar and it's non-GMO. What more could you ask for?


The process is very simple, even if you've never done this before. You only need two eggs, some oil and water or almond milk to put into the mix and make it into a dough. The dough is going to be pretty sticky, so having a pizza stone will help a lot in this regard. But you could also make this in a regular tray, non-stick or lined with parchment paper.

And my friends, it was amazing! I love thin crust pizza, and that's exactly how it turned out: thin crust, a bit crunchy on the edges, but that depends on how long you bake it. No weird taste or funkiness this time. It was a really tasty home made pizza. And it's definitely made it into my bookmarks. Give it a shot, gluten-addicts out there - you might be pleasantly surprised!


Gluten-free pizza
~ makes 1 14-inch pizza

Crust
2 eggs
2 Tbsp olive oil
1/4 cup almond milk or water

Sauce
28 oz chopped tomatoes (I use Pomi, you can use canned)
4 oz tomato paste
1 tsp brown sugar
1 tsp salt
1 tsp dried basil
a dash of black pepper
1 tsp Italian seasoning (to make your own, throw together some dried basil, oregano, thyme. rosemary and sage) 


Toppings
1 cup shredded goat cheddar 
2 Roma tomatoes, sliced
1/3 cup thinly sliced onion rings
1/4 cup pitted olives
1/4 cup chopped green chile

Mix the crust mix with the eggs, oil and almond milk or water. Knead and form a dough with your hands and spread it using a rolling pin (or a wine bottle) on an ungreased pizza stone or tray.

Blend the sauce ingredients together. Spread some sauce over the crust and distribute it evenly. Sprinkle the cheese, then the tomato slices, onions, olives and finally the green chile. 

Bake 15-18 minutes until the edges are light brown. Easy!

Any questions, leave a comment!

Thursday, January 31, 2013

Zacusca


What do Eastern Europeans eat, I'm asked sometimes. Middle Eastern and Greek food are far more popular in the States, and while everybody knows what is a gyro or a shish kabob, few know what is a sarma. In the Balkans, we have a special liking for smelly cheeses, pickles and sauerkraut. But one thing that we really, really love, whether you live in Romania, Bulgaria or Serbia, is zacusca. This, at least, is something that we can all agree upon.

Balkanic people are frugal. They've had to be, because of centuries of foreign rule and imposed austerity. In the States we can have romaine lettuce in the middle of winter for $2.99 a bunch, peppers and tomatoes galore from Mexico, papaya from Belize and more tasty things. But in Romania, there are no such luxuries. Fruits and vegetables are scarce during the cold months, and whatever supermarkets offer comes from far away and is neither fresh, nor affordable. Meal staples during this time are root vegetables (beets, celery roots, parsnips) and legumes (beans, lentils). The only way to remember summer is to have it trapped, with all its marvelous flavors, in a jar. So traditionally, Balkanic families (specifically grandmas) do a lot of canning in the fall. 

In my family, zacusca was a very long and arduous project which grandma would perform stoically throughout an entire day of standing, roasting and mixing in the kitchen. I knew when the zacusca time had come because of the terrific smell of roasting eggplant, which permeated every corner of the house and made us all flock to the kitchen to catch a glimpse of the process. Grandma had enormous pots (or at least they were enormous compared to me, a little child) and she would energetically stir in them for a long time, until zacusca had precisely the right consistency. Then she would can 30 to 40 jars of the stuff and keep it in the pantry for the winter. And boy, was that zacusca a great joy for us in the cold winter months, when there was snow outside and we could sit by the window and pop open a jar of the red deliciousness and spread it on warm slices of freshly baked bread...


Zacusca (Lyutenitsa)
~ makes about 6 cups

2 medium eggplants
2 red bell peppers
1 sweet onion, minced
2 cups (16 oz) chopped tomatoes (I use Pomi, you can also use canned)
1 bay leaf
olive oil
salt, pepper, to taste (if using chile, skip the pepper)
1/4 cup hot green chile or 1/2 tsp cayenne pepper, optional


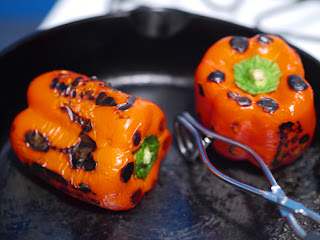
First, we're going to roast the eggplant and peppers. So find yourself a good audio book or podcast, because you're going to be in the kitchen awhile. You can do this in a cast iron skillet or a tortilla pan (or even directly over the fire if you have a gas stove). 


Set the pan on medium-high heat and place the eggplant and peppers inside. Turn them with tongs every few minutes to make sure they're equally roasted on all sides. If the heat is high enough, you'll have to do this every 3 minutes or so.

Note: you can also just bake the vegetables, but they won't have the same delicious roasted flavor and honestly, that's what makes zacusca. So don't be lazy!


When the peppers are done, set them immediately in a pot and cover them quickly. They need to "sweat" in there so you can peel them easily.


In the meantime, peel the eggplants as soon as they're cool enough to touch. Don't use metal utensils at any time to manipulate the eggplant meat, because it will turn dark. Use only wood or ceramic. Peel the eggplant and then chop it horizontally and then vertically lots of times, until you get a mash. I use a large wooden spoon to do this, but maybe you can find an even better tool (not metal!).


Then peel the peppers and chop them very very small. Keep the juice too, it's very tasty!

Heat up some olive oil on low heat and add the onions with 1 tsp of salt. Cover and cook for 7-8 minutes, stirring some. You want to smother, not caramelize it. Then add the peppers and bring to a boil.


Add the eggplant, then the chopped tomatoes, black pepper, bay leaf and chile if using. Mix well, reduce the heat to low and partially cover (it will splatter, so be careful).

Boil for 1 hour stirring frequently, every 5 minutes or so. Season with more salt if you need it.


Eat by itself, on bread, as a snack, with pasta, with potatoes or with eggs, or however else! Zacusca is just awesome!

Recipe adapted from Laura @ Retete ca la mama.

Saturday, January 19, 2013

Amazing glutenless almond-based chocolate chip cookies


I love cookies. I do. Unfortunately, I now know that sugar is far too ubiquitous and far too deceitfully camouflaged in so many food items, for it to be harmless. There is sugar in soda, we know that. But if you try to get around it with diet soda, you open a whole can of worms with artificial sweeteners, most of which are far worse for you than sugar. If you're wondering why, read Kimberly's short article.

And yes, there's sugar in cakes, cookies and other sweets. We know this too. When I was young, these things were to be enjoyed occasionally, at someone's birthday or some special event. We certainly didn't have cookies every day. Now, it seems there isn't a day when there aren't cookies, donuts, cakes or some such seductive treat around the office. I thought to myself that if I have good self restraint and limit my portions, that there was nothing wrong with it. But as I became more aware of the range of sugar-containing food items out there, I became alarmed. I now cringe at how challenging it is to avoid sugar, and how miserable my life would be if I chose to avoid sugar completely. Not only would it turn me into a social outcast, but it would also make me a frustrated grocery shopper, because - are you reading those labels carefully? - pretty much everything contains sugar. Even things that make you scratch your head, like tomato soup!

How did we get to this? I was at Starbucks the other day and wanted to buy a snack to go with my coffee, as I've done so many times before. But this time, I had my sugar radar on. So I scanned the pastry window in search of a sugarless treat, perhaps even (is this wishful thinking?) some salty pastry of sorts. Tough luck. The only sugar-free snack at our Starbucks were the bagels (and even some of those might be sweetened, for all I know). Their bagels are quite good and I'm sold for the Multigrain kind in particular, but I would appreciate more choices nonetheless. Do we really have to add sugar to everything?


To limit my sugar intake, as well as to make a point that I think deserves to be made, I now use less processed and milder sweeteners, and in smaller amounts. One of these is Stevia, of which my favorite variety is the Vitamin Shoppe liquid form. It had the least amount of bitterness  from all I've tasted. Another sweeteners I use are coconut nectar and coconut crystals. These are unrefined sweeteners that are just as sweet as brown sugar. They don't have a coconutty taste at all. But they are quite expensive. The 'Coconut Secret' brand I buy from Whole Foods is about $8 for 14 oz. So you end up using less, because it's precious, and in the end that is a good thing - you know what I mean? We need to re-educate our palates, which are so ridiculously poisoned by sugar, salt and fat in excess, and remind them how to taste subtle flavors. So, to illustrate, these cookies are killer, and not a drop of sugar in them!


Amazing glutenless almond-based chocolate chip cookies
~ makes 16 cookies

1 1/2 cups almond meal (or almond flour)
1/2 cups coconut flour
3/4 cup coconut crystals (or brown sugar, if you must)
1 4-oz 100% cacao unsweetened chocolate baking bar (Ghirardelli works)
1 tsp baking soda
1 tsp baking powder (aluminum free!)
1/2 tsp salt
1 cup raw creamy almond butter (Trader Joe's works)
2/3 cup coconut oil, melted
1/4 cup coconut milk (or almond milk)
1 tsp vanilla extract


In a heavy mortar, start to smash the chocolate bar with the pestle into small chunks, square by square. In the end, you'll end up with about a cup of chunks (you can just buy chocolate chunks if you like, instead of going through this). Whatever you do, do not buy any chocolate with sugar in it - kind of defeats the purpose.


Mix the dry ingredients together in a large bowl, including the chocolate chunks.

Take another bowl and add the almond butter, coconut oil, coconut or almond milk and vanilla extract in there. Use a fork to whip everything together so the oil and butter combine well.


Add this to the dry ingredients and mix everything into a dough. It's going to be an oily dough, but if you find that it's disgustingly oily you can correct that with a few sprinkles of coconut flour.

Now take a large tray and grease it with coconut oil or line it with parchment paper. Take the dough and mold it into approximately 16 delicate cookies, trying to push the chocolate chunks inside as much as possible, because otherwise they "bleed" chocolate everywhere during the baking process.

Bake at 350 for about 25 minutes. You know they're ready when they are lightly amber around the bottom. Let them cool completely before removing from the sheet. They'll be very fragile when you first pull them out. 

On a final note, these might be pretty expensive cookies to make, but they might just be the best I've ever had (and I've had a LOT). I think - and I'm not leading you astray here - everyone should make these at least once in their life.

Recipe adapted from Jenny @ the Clean Blog.

Any questions? Leave a comment!